Monday, March 15, 2010

Ten Pounds Lighter

Dateline – Mar 13 - The car is really starting to make some progress. Saturday was a good solid day of body work. I finished stripping the right front wing and door and started the left side. Once I have these done I’ll be done with the stripping, and boy that can not happen soon enough! I’m really tired of peeling paint off the car!

I also started to remove the old rusty metal from the car, starting on the passenger floorboard. This was some of the largest areas of rot on the car, so of course I decided to attack it first. I used my new jig saw and angle grinder to removed about ten inches of bottom floorboard, and eight inches of the upper floorboard. I found a little prize when I cut into the upper floorboard because I did not realize there is a chamber behind it that is created by the wheel well/firewall and the floor broad. I don’t know why Jaguar built the body this way, but fortunately, the chamber has a big drain hole and so the inside looks like it is in good condition. This is definitely someplace that is going to get the POR 15 (http://www.por15.com/) treatment! I spent a good amount of time grinding away on the old rusty metal and cleaning off the painted surface, but it looks like it is about ready for welding. Now I need to get that sheet metal and welder!


Another thing that kept me busy was removing the tarlike sheet of material that was stuck to the top of the floor board as sound proofing. I had to remove this because as I started hammering on the floorboard to straighten it, this stuff cracked off. A heat gun and some chiseling action removed it.

Finally, I bought some glue/mastic remover and went through the entire right hand side of the car to remove all the old horse hair and glue that was stuck to the body.


I still have to remove the tar stuff on the back floorboard and deal with some rust around the “b” section (the brace the runs from the “b” pillar to the transmission tunnel) that the front seat bolts to. This is pretty superficial, but I want to grind it down and make sure I’m not missing anything. I will end up welding some new metal in there I suspect although not the whole section. That’s all that’s left of the right side!


Next, I’m going to attack the left side of the car. I’ve got some rot around the transmission tunnel that will require some grinding, but I don’t think I will need to cut and replace a lot of metal here. There is a lot of surface rust, and I need to get the emergency brake handle, gas pedal and brake pedal out of the way so that I can finish up. Once the left side is done, I can weld in the new sheet metal (did I already say I need to buy the welder?!), rust treat, prime and paint!!!!!! Pretty exciting stuff!

Tuesday, March 9, 2010

Look Mom! No Interior!

Dateline – Mar 5 – 7 Well, it has been a very busy weekend. Friday night I took out the front windshield and ground down the paint around the window seal. A lot of pitting, a few holes but nothing very bad! This was the last real worry spot for me, so I’m very pleased. Looks like I’m going to be able to recover this body after all! I also stripped the paint off the scuttle, so I’m getting real close to being done with the paint stripping (yah!)


This weekend I took off the front left wing and door. The left wing is also in good shape although I have not started stripping it yet, so there may be something hiding under there.


I also took the entire interior out including the dash and the heater/air control ducting except for what’s left of the headliner and trim pieces. This was a real pain, but it sure will make the interior much easier to work on. Some things I found:


1) More rust, of course. The right side front floorboard under the dish and part of the firewall is totally shot! I will need to weld in new metal here, since there is very little metal left!

2) Rust around the left front floorboard and transmission tunnel. More sheet metal here will be good.

3) Someone must have jacked the car up using the floorboard instead of the jacking point (a real no-no!) because there was 2” gap where the left floorboard had been torn away from the firewall. The seam was totally split and this whole area was just open to the elements! This may have been a good thing since no water could collect there when the car was sitting, so it saved a lot of the metal from rusting away.


4) The car was equipped with air conditioning at some time, which I suspected. It made pulling the air ducting out a real pain because the inlet/outlet pipes run through the firewall!

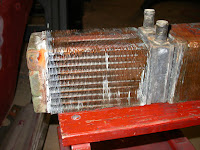
5) The heater core was leaking, thus the fogged up windshield when I tried to use the heater!


6) The wiring harness is in amazingly good shape, although I found a relay (not sure which one yet) that had a terminal completely corroded off!


7) Lots of rust on the under side of the dash/firewall. This was once covered in fabric that was really good at holding the water against the metal causing it to rust. Plus, with the windscreen leaking, there was plenty of opportunity for water to get in there.

So, what’s next?

1) Finish stripping the right side door and front wing, and start the left side.

2) Remove the headliner and upper trim pieces (all that is left of the interior)

3) Cut out the bad metal all around the car (I just bought an angle grinder this weekend! New tools! Cool!)

4) Clean the interior to remove all the old glue/horse hair padding and flaking rust.

5) Start fabricating the missing sheet metal.

6) Buy a Mig welder (anyone know somebody selling one?)

7) Weld the sheet metal inside

8) Treat the entire interior in rust recovery paints

9) Paint the interior.

10) Open a bottle of champagne!

Thursday, March 4, 2010

Right Side Down, Left to Go

Dateline - Feb 27 - Mar 3rd - Finished stripping the paint off of both back doors and started down the right side of the car. I was just going to concentrate on removing the front doors and doing those, but I found that I really needed to take the front wings off in order to get the door off. So I pulled the right front fender instead of the left front door, basically stripping the right side of the car.


The front wing was a struggle to remove because the last two bolts in the front of the fender were under sheet metal that had been smashed down in an accident. It took about an hour to get to them and get them loose! A lot of work!

When I pulled the fender, I found about a pound of dirt piled up in the creases! The engineering on this car hearkens back to the 1930's. Instead of welding things together, panels are screwed together with rubber gaskets to keep the water and dirt out. Well imagine what the wheel well of a car that has 40 year old rubber gaskets would look like. Yes! Rust!

Fortunately, the wing itself looks like it is in good nick, although it has a serious dent by the antenna hole that someone used a screw-in dent puller to pull out and then filled with Bondo! Not a professional job and that is probably why the Bondo cracked on the surface. I'm going to find more filler on this fender I fear!


I also pulled the front right seat out of the car and the remaining carpets. The floor boards are in some pretty sad shape rust wise, but nothing that can't be repaired with new sheet metal welded in.


I've got the wing and door stripping paint right now, so I hope this weekend to be able to get them done. Next I'm going to either pull out the front window and deal with the front scuttle, or pull the left door and fender off. I've not decided yet.