Tuesday, December 27, 2011

Great Movement Forward

Dateline - Dec 27 – I got a lot done over the last few weekends.  I finished the headliner and four pieces of trim that go around it including the tops of the front and back windows and the strip that runs over the tops of the doors and down the sides of the back window to the back deck. These pieces were particularly difficult because they consisted of a metal strip that required sanding, rust encapsulation and painting, a pressed wood piece that formed the main structure that needed to be completely recreated, a rubber piece that looks like a pool table rail that is glued to the metal piece and about 20 metal fasteners that needed to be cleaned and rust treated.  The car had both sides of this trim, but neither was complete. With what was remaining I had enough pieces to make a pattern for the wooden parts and was able to fabricate those out of pressed board.  The rubber piece was a little harder.  On one side it was complete, but on the other side, there was about 9 inches missing in the back.  I knew I wouldn't be able to source this easily, so I would have to come up with another solution.  Cleaning the metal clips (20 in all) was going to be a challenge too, but fortunately for me, I have a vibratory part cleaner that made short work of them.  


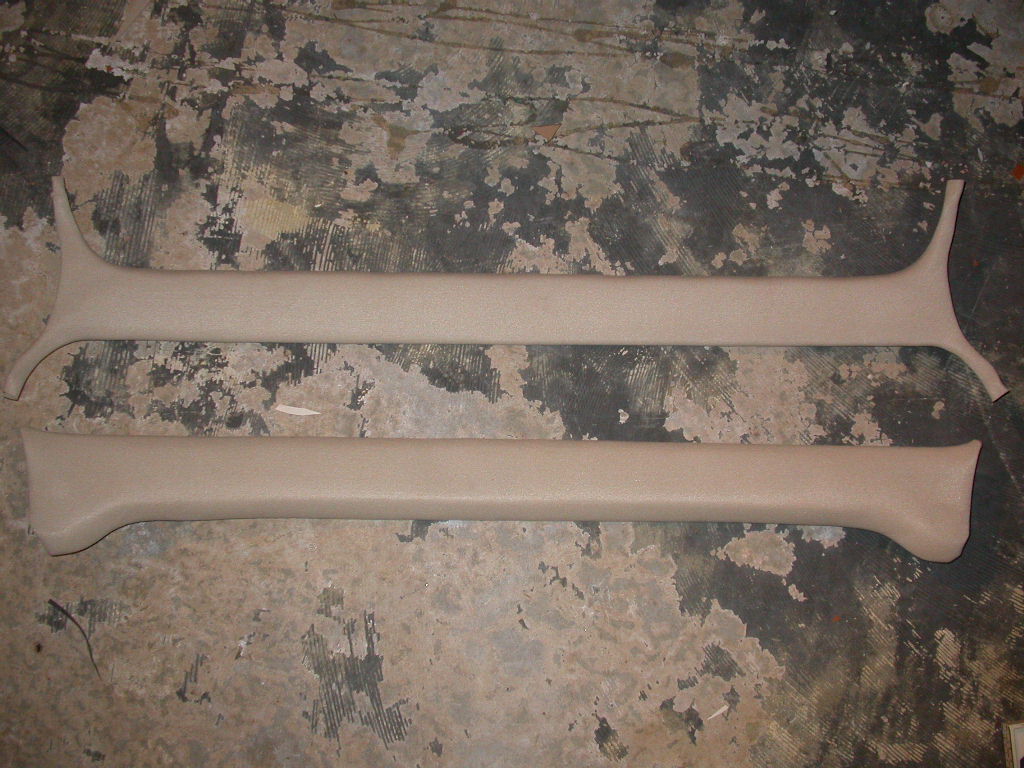
Once I got all the pieces made, cleaned and painted then started assembly.  This had to be done in a specific order.  First the clips needed to be glued to the rail.  Then the rubber piece needed to be glued to the rail over the backs of the clips.  I then had to replace the nine inches of missing rubber.  I did this by using pink foam epoxied to the rail and sanded to shape. Then I upholstered the wood piece and the assembled metal/rubber/clips piece with headliner upholstery.  Then I assembled the two upholstered pieces, using the clips to hold everything in place.  They really look good and I'm very happy with the results. (Sorry I didn't take any pictures of the assembly process, but here are pictures of the finished pieces including the headliner and upper window frame pieces)


While working on this, I was also working on getting the two back deck pieces and two front window side frame pieces that are upholstered in the "wine" colored vinyl.  This was pretty straight forward, using rubber cement to glue the vinyl.  The front window side pieces required five separate steps to get everything glued down because of the multiple complex curves being covered.  But I'm happy with the results. The big challenge with the back deck was the air flow vent in the center of the deck. This consisted of a metal framework with a metal mesh piece inside, and an upholstered wood cap on top. I had to clean, sand, rust encapsulate and paint all the metal pieces, and upholster the wood top piece. I picked a Rustolum flat enamel paint in a rattle can for the metal pieces. It looks pretty close the color of the vinyl, so that worked out well.


I also worked on reshaping the door handles so that they would be easier to upholster.  I added pink foam and sanded to shape, then fiber glassed over them.  I had some problem with an epoxy mix that did not set, so I had to redo one of the handles, but overall, I'm happy with the results.  These will be much easier to cover and actually, I like the look better.  So win-win!


While I was reshaping the door handles, I also worked on sanding and fitting the foam for the center console fascia. I knew that I was going to need to do some fitting after I got the center console upholstered, plus I changed my plans and decided to go with a single DIN radio on top with a cup holder below, instead of a 2 DIN radio. So I added some foam and sanded down the rest so that it will fit in the center console. Now I need to do the fiberglass/carbon fiber layup.


After getting the door handles shaped, it was time to upholster. I needed to cut and sew the upholstery for both door handles as well as one of the door pockets. I spent the better part of two evenings doing that and then half a day gluing the upholstery to the handles using rubber cement. They came out REALLY good, and I’m very happy with them. I also lined the insides of the pockets with headliner material so that things put into the pockets wouldn’t rattle.


Finally, I worked on getting the door upholstery done. I ended up with a challenge that I didn’t figure on when I created the door panels themselves; the depth and steepness of the door opener handle and the carbon fiber inset. I knew that I wasn’t going to be able to stretch the vinyl to fit into the holes, so I was planning on sewing an insert into them. However, this turned out to be much harder than I thought, partly because I’m not the most skilled upholstery person and also the difficulty in working with the fabric. I tried sewing in a piece into the door handle area and it looked horrible. So I came up with a brilliant plan to deal with the carbon fiber inset. I created a flat wood panel that the carbon will be glued to and that will then be screwed into brackets added to the back of the door panel. This way, the panel will stretch the vinyl into the hole enough so that I don’t have to deal with sewing.


The door opener handle will be a little more difficult. I was going to try to create a fiberglass/carbon inset that would fit over the vinyl, but that just was not turning out the way I wanted. So I decided to create a vinyl inset that will be glued to the door panel over which the vinyl for the door will sit. I will need to glue this vinyl to the vinyl inset, but that will look much more clean then trying to sew all the pieces together. I may have to make some more adjustments to get this just right, but I think I’m on the right path.


It's really nice to have so many pieces DONE and ready to go into the car.  Things are moving forward and if I keep up the work through the winter, I may be able to make a running date for the Greenwood Auto Show this year.  That's the plan anyway!

Next:  Finish the upholstery for the doors and lay up the center console fascia. Then I need to start on getting the wiring sorted.  After that, finish the dash including the wood and the lower fasciae that need to be shaped, fiber glassed and upholstered.  After that, it’s a matter of getting the rest of the body work done and painted, then I can start putting things back together.

I do have two major purchases I have to get yet:  Gas tanks and carpets.  I also need to get all my chrome pieces in to be re-plated.  But things are starting to move forward!  Very exiting!

Friday, December 9, 2011

Recaping the Summer and New Work

Dateline – Dec 8, 2011 – Well, after a long summer of doing other things, I’m back to working on the car! It’s hitting the cold and wet season, so I am going to concentrate on getting interior done, since I can do that in the house.

I left off with door panels and getting my new sewing machine and materials. Earlier in the year, I completed the upholstery on several pieces of the interior, including the center console (still have a few details to iron out), the center kick panels that have the heater vents in them, the front side kick panels, and the fabric for the “B” pillars. The side kick panels were interesting because they were originally made of pressed paper. Years of moister destroyed those, so I recreated them out of mat board and sealed with roofing sealant. We’ll see how well they hold up. I’m thinking they will do okay.


I let the car sit for about three months to do other things, but started back on it in November by going over to my friend Matt’s house and using his woodshop and experience to work on the dash. We had worked on it in the spring, finding some amazing book-matched pieces of maple at a hardwood lumber store in Seattle (Cross Cut Hardwoods - http://www.crosscuthardwoods.com/). We were looking for good quality plywood to be the backing for the pieces of birds-eye that we had cut up in February. We found the substrate, but also found this amazing book-matched maple and decided to make it into the new dash instead. So we cut everything roughly to shape and glued the maple down to the substrate with gorilla glue. Several months passed and then we got together to start shaping the dash from the rough pieces. We got the left and right sides drown out and cut, including the holes for the speedo, tach, air vents and glove box door. Matt has the appropriate wood working tools that made this much easier to do and we have much better results then I would have hacking stuff out with a saber saw in my garage. It’s so nice to use the right tool for the right job. It’s also nice sharing in a fun project with a friend!


Even though I had worked on the dash, the car itself still languished in the garage, becoming an SUV (Storage Utility Vehicle, or “place-to-put-boxes-and-stuff”). So, I started the first week of December by cleaning up my workspace, moving things off the car, and then starting to strip, rust remove and paint the interior trip components including the metal pieces that go around front and back window, the back deck components and the trip the runs along the top of the doors from the front window to the back. Several of these pieces either have pressed wood components or are all pressed board. These will need to be replaces and I’m using what is left of the originals to fabricate to pieces. Fortunately, there are enough pieces left to get a good pattern.


I also completed fabrication on the right (Passenger) side door panel. I had laid up the fiberglass in the spring and then left it until later to finish. I got it all done and fitted including pressed board insets glued to the back of the door panels for the plastic holders that hold the door panel onto the door.


I started sewing the upholstery for the arm rests/door pulls and realized that the complexity of the shape is going to be really hard to cover with vinyl, akin to covering a steering wheel. To make things easier, I’m going to modify the shape so that it will be easier to cover. This should be pretty easy to do by adding some more pink foam and glassing over that. The time savings in upholstery work will easy pay for the extra foam/glass work. Also, I think it will ultimately look nicer too.

I have also covered the left (driver’s side) door panel with the foam substrate and have started the upholstery, sewing the burgundy and tan vinyl together. I’m going to need to create a separate piece that will be sown in around the door handle because I will not be able to get the vinyl to stretch enough. This will be tricky to get right, but I’m getting pretty good with the sewing machine.


The next work is to complete the fabrication of the wood interior parts, checking fitment and covering everything with the appropriate materials (headliner material and/or burgundy vinyl). I also have to fix and cover the headliner which I had sitting outside the car when a tent fell on it and broke it! I should be able to repair it, but it needs to be pretty smooth in order for the head liner to look good. Will probably need to do some more fiberglass work here!

To Two Loving Dogs

Dateline – Oct and Nov 2011 – October and November were two very sad months as our two dogs, Casey and Sheeba had to be put to sleep. Casey had a stroke in October and Sheeba, who had been battling old age, arthritis, and many fatty tumors, just could not continue her fight. Both dogs died at home. They were 17 and 16 years old. I miss them terribly. They were a part of my life for 12 year and left a large hole in my heart with their passing.

All British Field Meet

Dateline – July 23, 2011 - Entered the XK8 in the Western Washington All British Field Meet (http://abfm.com/past/2011abfm/). It was quite a showing being that it was the 50th anniversary of the Jaguar XKE and 80 years of MG! I’ve never seen so many E-Types in one place at one time, and I was parked right across from them! I also got a chance to meet several other XK8/R owners and signed up for membership in the local Jaguar Club.


There were so many cars of note there, but the two that stood out to me was the 1968 XJ6 Series 1, in red, just like mine! This car was in great shape and even though it has miles on the clock, it has been very well taken care of and is a registered classic. If mine was anywhere near this nice and had the original engine, I would have worked toward getting it to this shape. But, I have a different animal then this!


Also there were several of the other car I love, the Mark II. OMG these are just gorgeous cars. There was even one for sale for $35K. OK, don’t have the money, or the garage space, but boy would I like one of these! Maybe after I get my current project done…


Classic Races

Dateline – July 1 - I took the new kitty down to the Sovern Pacific Northwest Historics races at Evergreen Raceway (http://sovren.org/events/historics/ and http://www.victorylane.com/articles/2011_09 SOVREN PacifcNW.pdf). This was a great day to get the car out and be with a bunch of classic race nuts. You can get an idea of the types of people at the race when you see who was parked next to my car in the parking area!


It was a wonderful day to be out; warm but not too warm, plenty of fun cars to look at and some pretty good racing on the track. This is a really great event because you can actually mill around in the pits and see the cars up close, many times with their bodywork off. These cars are driven in anger (sort of) and many of them need minor and sometimes major repairs after the heats.

Probably the star of the show for me was the 1934 Alfa Romeo P3 (http://en.wikipedia.org/wiki/Alfa_Romeo_P3). I got a great look at this guy in the pits and was also able to see it raced on the track. It is hard to believe this is the way people raced cars in the past. Very, very impressive!

Tuesday, May 31, 2011

Two Kitties In The Garage

Dateline - May 31st 2011 - This weekend was the third anniversary of getting the XJ6 and after a year and a half of sitting on jackstands, I was thinking it was getting lonely all by herself. Cats can be that way. They are pretty solitary animals, but they do need companionship. So, after about a month of looking through ebay.com, craigslist.org and AutoTrader.com, and many, many CarFax searches, I found a really nice companion for my XJ6.

Let me introduce "Topaz".


She is a 2002 XK8, Fully loaded, single owner car, with 79K on the clock! This car just "purrrrrs" and is so fun to drive I have to pinch myself so that I don't think I'm dreaming! I've wanted one of these since they first came out in 1996. I just can't say how excited I am about it! I did debate over a convertible or coupe, but the coupe is just so gorgeous, and I live in Seattle! A convertible here means that I get to have the top down about 10 days a year!

Am I crazy owning two Jags! YUP! But I'm a happy crazy guy!

Meanwhile, work is still happening on the XJ6. I've purchased an industrial sewing machine to do the upholstery (Got to love Craigslist.org),


and have all the vinyl including 8 yards of tan and 2 yards of "Wine" for the dash and back deck tops. I also have the headliner material too. The thread and adhesives came in today, so I'm going to be a sawing and gluing fiend here soon!

I now have the driver side door panel, arm rest and side pocket glassed and ready to cover with vinyl.


The center console is done along with the kick panels and I've created the center console fascia in pink foam that will be covered in fiber glass and then carbon composite. I need to get the vinyl covering on the center console done first to make sure everything fits.


The passenger side door panel is carved but not yet glassed, but I do have the door handle and side pocket glassed and reinforced.

I also got a whole bunch of parts in. New rubber seals for just about everything (doors, door handles, locks, side markers, tail lights, backup lights, front directionals, and the bonnet), a new/used steering column to fix the bad lower column bearing that is shot, new brake master cylinder, brake hoses, side emblems (that will be used on the door panels) and a 5" "Leaper" for the hood!

I've got just about everything but the carpets and gas tanks at this point. Things may start happening soon. I do have to avoid the temptation to drive the new cat all the time, however! But such a bad temptation to have!