Tuesday, May 25, 2010

Rebuilding the Bad Area

Dateline – May 1 – 12 – One of the worst surprises on this car was the condition of the back right scuttle just inboard of the right gas filler. I’ve posted before about the condition before Well, now it is the time to attack the problem.

First, I had to create the sheet metal replacements. This required creating paper templates, cutting, bending and fitting eight pieces of 18 gauge sheet metal. This took a lot of patience and a lot of time! This is also where the Shrinker/Stretcher came into real play. I was able to create the pieces that would become the new rear window frame, and the back trunk edge with these tools. Pretty fun to use too!


After I got the pieces fabricated, I started the assembly process by prepping the exiting body. There were some holes that needed to be welded closed first, so I took care of that. Then I started assembly. I’ll let the pictures speak for themselves:


You will notice in the following pictures that the upper window frame is in and I built up a fillet to match the shape of the body. Again, not the best welding, but this will be covered in a thin coat of body filler, so it will look fine when done.

New Floorboards

Dateline - Apr 17 – 24 – Well, I bought all the tools I needed to do the sheet metal work, including a Mig welder, shrinker/stretcher set, small metal brake, new angle grinder disks and a bunch of hacksaw blades.

In prior posts, I showed the metal that I had cut out of the car to get rid of the rust. Now I’m going to put metal back in, starting at the floor boards. I picked up some 18 and 20 gauge steel at a local metal wholesaler and started making the floorboards. I needed to replace part of the bottom floorboard as well as the kick panel. I decided to fabricate these out of flat steel instead of trying to get the complicated rolled texture. However, I was worried about the strength, so I put a “Z” bend into the floorboard replacement where it meets the old floorboard. This gave me a good surface to weld to and gave the metal a great deal of strength. The kick panel is just a flat piece, cut and bent to fit into place. Since this will not get the abuse that the floorboard will get, I was not as worried about reinforcement here.

After fitting and bending, I primed and painted all surfaces that are going to be welded together to prevent rust. I knew that I would cook off some of the paint in the welding processes, but I can reach these places and will paint over them later.


Now, I have to admit that my welding was pretty bad! I think my 8th grade shop teacher, Mr. Plummer, would only give me a C- for the work! But it is welded together and since this really isn’t structural, I’m not terribly worried about it. It did take a lot of work with the angle grinder though to get it into any kind of presentable view.

After all the welding was done, I filled all the seams with Eastwood seam caulk, primed and painted. Here are the results!

Monday, March 15, 2010

Ten Pounds Lighter

Dateline – Mar 13 - The car is really starting to make some progress. Saturday was a good solid day of body work. I finished stripping the right front wing and door and started the left side. Once I have these done I’ll be done with the stripping, and boy that can not happen soon enough! I’m really tired of peeling paint off the car!

I also started to remove the old rusty metal from the car, starting on the passenger floorboard. This was some of the largest areas of rot on the car, so of course I decided to attack it first. I used my new jig saw and angle grinder to removed about ten inches of bottom floorboard, and eight inches of the upper floorboard. I found a little prize when I cut into the upper floorboard because I did not realize there is a chamber behind it that is created by the wheel well/firewall and the floor broad. I don’t know why Jaguar built the body this way, but fortunately, the chamber has a big drain hole and so the inside looks like it is in good condition. This is definitely someplace that is going to get the POR 15 (http://www.por15.com/) treatment! I spent a good amount of time grinding away on the old rusty metal and cleaning off the painted surface, but it looks like it is about ready for welding. Now I need to get that sheet metal and welder!


Another thing that kept me busy was removing the tarlike sheet of material that was stuck to the top of the floor board as sound proofing. I had to remove this because as I started hammering on the floorboard to straighten it, this stuff cracked off. A heat gun and some chiseling action removed it.

Finally, I bought some glue/mastic remover and went through the entire right hand side of the car to remove all the old horse hair and glue that was stuck to the body.


I still have to remove the tar stuff on the back floorboard and deal with some rust around the “b” section (the brace the runs from the “b” pillar to the transmission tunnel) that the front seat bolts to. This is pretty superficial, but I want to grind it down and make sure I’m not missing anything. I will end up welding some new metal in there I suspect although not the whole section. That’s all that’s left of the right side!


Next, I’m going to attack the left side of the car. I’ve got some rot around the transmission tunnel that will require some grinding, but I don’t think I will need to cut and replace a lot of metal here. There is a lot of surface rust, and I need to get the emergency brake handle, gas pedal and brake pedal out of the way so that I can finish up. Once the left side is done, I can weld in the new sheet metal (did I already say I need to buy the welder?!), rust treat, prime and paint!!!!!! Pretty exciting stuff!

Tuesday, March 9, 2010

Look Mom! No Interior!

Dateline – Mar 5 – 7 Well, it has been a very busy weekend. Friday night I took out the front windshield and ground down the paint around the window seal. A lot of pitting, a few holes but nothing very bad! This was the last real worry spot for me, so I’m very pleased. Looks like I’m going to be able to recover this body after all! I also stripped the paint off the scuttle, so I’m getting real close to being done with the paint stripping (yah!)


This weekend I took off the front left wing and door. The left wing is also in good shape although I have not started stripping it yet, so there may be something hiding under there.


I also took the entire interior out including the dash and the heater/air control ducting except for what’s left of the headliner and trim pieces. This was a real pain, but it sure will make the interior much easier to work on. Some things I found:


1) More rust, of course. The right side front floorboard under the dish and part of the firewall is totally shot! I will need to weld in new metal here, since there is very little metal left!

2) Rust around the left front floorboard and transmission tunnel. More sheet metal here will be good.

3) Someone must have jacked the car up using the floorboard instead of the jacking point (a real no-no!) because there was 2” gap where the left floorboard had been torn away from the firewall. The seam was totally split and this whole area was just open to the elements! This may have been a good thing since no water could collect there when the car was sitting, so it saved a lot of the metal from rusting away.


4) The car was equipped with air conditioning at some time, which I suspected. It made pulling the air ducting out a real pain because the inlet/outlet pipes run through the firewall!

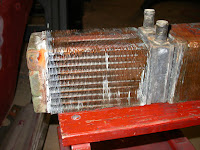
5) The heater core was leaking, thus the fogged up windshield when I tried to use the heater!


6) The wiring harness is in amazingly good shape, although I found a relay (not sure which one yet) that had a terminal completely corroded off!


7) Lots of rust on the under side of the dash/firewall. This was once covered in fabric that was really good at holding the water against the metal causing it to rust. Plus, with the windscreen leaking, there was plenty of opportunity for water to get in there.

So, what’s next?

1) Finish stripping the right side door and front wing, and start the left side.

2) Remove the headliner and upper trim pieces (all that is left of the interior)

3) Cut out the bad metal all around the car (I just bought an angle grinder this weekend! New tools! Cool!)

4) Clean the interior to remove all the old glue/horse hair padding and flaking rust.

5) Start fabricating the missing sheet metal.

6) Buy a Mig welder (anyone know somebody selling one?)

7) Weld the sheet metal inside

8) Treat the entire interior in rust recovery paints

9) Paint the interior.

10) Open a bottle of champagne!

Thursday, March 4, 2010

Right Side Down, Left to Go

Dateline - Feb 27 - Mar 3rd - Finished stripping the paint off of both back doors and started down the right side of the car. I was just going to concentrate on removing the front doors and doing those, but I found that I really needed to take the front wings off in order to get the door off. So I pulled the right front fender instead of the left front door, basically stripping the right side of the car.


The front wing was a struggle to remove because the last two bolts in the front of the fender were under sheet metal that had been smashed down in an accident. It took about an hour to get to them and get them loose! A lot of work!

When I pulled the fender, I found about a pound of dirt piled up in the creases! The engineering on this car hearkens back to the 1930's. Instead of welding things together, panels are screwed together with rubber gaskets to keep the water and dirt out. Well imagine what the wheel well of a car that has 40 year old rubber gaskets would look like. Yes! Rust!

Fortunately, the wing itself looks like it is in good nick, although it has a serious dent by the antenna hole that someone used a screw-in dent puller to pull out and then filled with Bondo! Not a professional job and that is probably why the Bondo cracked on the surface. I'm going to find more filler on this fender I fear!


I also pulled the front right seat out of the car and the remaining carpets. The floor boards are in some pretty sad shape rust wise, but nothing that can't be repaired with new sheet metal welded in.


I've got the wing and door stripping paint right now, so I hope this weekend to be able to get them done. Next I'm going to either pull out the front window and deal with the front scuttle, or pull the left door and fender off. I've not decided yet.


Monday, February 22, 2010

Moving Forward – Literally!

Dateline – Feb 21-22 – Accomplished more work this weekend. I removed both back doors and have them stripping. I found that heat makes a big difference with the stripper. I’ve been leaving the stripper on the car for three or four days and it sometimes barely breaks the surface. I left one door in the sun on Saturday and in three hours all the first layer of paint was sloughing off! If I’m in a hurry, heat is a real good thing!


I also removed the bottoms of the back seats and guess what I found – more rust! Hard to believe I know. It was also painfully obvious that the replacement seats in the car were not only not the right size, but not even Jaguar seats. I think these came out of something like a Land Rover. They did not fit at all and I even found wood blocks under the seats to hold them up! So, I am now in search of the correct back seats. I was kind of thinking that putting two race seats back there would be fun too, but that would be expensive! I think I’ll just stick with finding a good condition used back seat. I sourced one in the fall, but I don’t know if that is still available.


Finally, I removed all the carpeting and sound proofing in the back, so I have a really good idea of what I need to clean, scrap, weld or replace. Fortunately, all the rust except in a couple of non critical places looks like surface issues, which is really good because if the rust was extensive around the “C” or “B” pillars, I might as well write off the car. As it stands, I haven’t run into anything that can not be repaired.


It's also good to know that, even by 1971, the Brits had still figured out how to include wood in the construction of cars! These pieces of ash are under the aluminum rocker covers to keep them from crushing if stepped on.


After I get the back door stripped, I’m going to remove the glass and chrome and put them aside. Then I start on the front doors, front seats and interior. Definitely moving forward!

Sunday, February 14, 2010

Work Begins Again!

Dateline - Feb 13 – 14 – Wow! I just realized it's been since October that I last posted! A lot has happened since then in my life, so the Jag has spend some time in the garage, collecting dust (and stuff!). Over the last several months, I've taken a few hours here and there to work on the back quarter of the car. I decided that I needed to remove the paint on all the side panels so I could see the extent of the rust. I tried sanding, but managed to spend hours just cutting through the top layer of epoxy based aircraft paint on the car! Tough stuff. Then someone mentioned stripping the paint. I've used paint strippers before and just did not want to deal with the mess, smell and toxic clean-up. I thought about the idea for several weeks, then broke down and went to my local Home Depot. And guess what I found. Citrus based paint strippers, safe for in house use! WOW! So I bought a small bottle for $11 and tried it out on the left rear fender, which is the one I tried sanding down. I put a thin coat on and got some good effect, but it wasn't really cutting through the paint. So I then really globbed it on! OMG! Paint sloughing off left and right! It even softens and weakens polyester Bondo products! Three to five days of sitting on the paint and a good sharp paint scrapper had the paint removed! I now have the whole back end clean of almost all the paint. I still have some sanding to do before I do the body filler, but wow, so little work! And my garage is not full of red paint dust! And only $33 dollars for the stripper! Precious!


Now that I have the paint off, I can see all the body filler! This car is not a virgin to the auto shop, let me tell you! There is a serious dent on the top of the left fender right by the gas filler. I think someone dropped a gas nozzle with significant force against the car! Also, someone bumped this car in the back, and it was not a love tap! Serious wrinkled metal and lots of filler! I think this was done early in the cars history, and the repairs are definitely professional. This car does not have a 5 MPH bumper like modern cars. The bumper is attached directly to the body, so any kind of rear end incident is going to make damage.


I also think the right rear fender was replaced, either because of this accident or another. I think that repair job is what caused all the rust issues because there is a lot of poor welding, metal that was not properly straightened, and lots, LOTS of Bondo!

So, this weekend I pulled out my body tools that I've not used in 20 years (since the Spitfire) and started at it! It took some drilling to get access to the fenders, and several hours swinging hammers, but I managed to get a lot of the rear metal straightened out. I'm still going to need to fill, but it will be a lot less. I can't tell exactly what I have until I fit the boot lid, but I'm thinking it is pretty good.


I also took the time to wire brush the entire boot area. Found some more rust and hole in the trunk floor and several on the sides, either hidden under Bondo, or covered by rust. However, this all looks repairable at this point. I've got a lot of welding to do eventually, but I'm looking forward to that!


Finally, I pulled the right passenger door off and put it on saw horses and started the stripping process. I'm going to pull each door in turn and clean it up. This will open the interior up so that I can clean it up too.


So, six hours of work, but I got a heck of a lot done. Starting to get excited about the car again. I just need to take my time and avoid perfection!