Dateline - December 2012 - Well I took a long break from the car to enjoy our spring and summer weather buy biking, some yard work, painting my deck and laying in the hammock. Now it's time to get back to the Jag!
It looks like March was my last update and I got quite a bit done before I stopped for the summer. In fact, I think it would be best to just line out what is done, what is in work, and what is left to do.
Done:
1) All the body filler work is done and 1/2 of the car (passenger side) has been sanded and ready for primer, including doors and door jambs. I still need to do the driver's side.
2) Reconfigured Heating/cooling system
3) Heater core refurbished
4) Headliner and all trim pieces.
5) Dash pad has been upholstered
6) A-Pillar covers upholstered
7) Center Console built and upholstered
8) Passenger side door panel
9) Driver and Passenger side door pockets
10) Upholstery for lower parts of B-pillars
11) Driver side lower dash fascia built and upholstered
12) Steering column cover molded and upholstered
13) Steering column turn signal and cruse control/wiper switch re-work
14) Moved fuse blocks from center of dash to behind lower passenger glove box and replace fuse types from old style glass to modern bayonet type.
15) Wiring to move power window switches to door panels - this was a lot of work!
16) Installation and wiring of a battery cutoff switch
17) Installation and wiring of new oil pressure sensor for new gauge
18) Installation and wiring of new water temperature sensor for new gauge
19) Wired Delphi connectors for headlights and front turn signals and side markers
20) Installation and wiring of transmission torque converter lockup
Started:
1) Carbon fiber center console layup - negative mold has been formed.
2) Carbon fiber window switch bezels
3) Driver's side door panel - was done but needed to rework because the door would not close around the dashboard - As Homer Simpson would say, "Do'h!"
4) Driver's and Passenger door arms - close but need some tweaking to get finished look
5) Passenger side lower dash fascia - Need to finish up the glove box.
6) Wood dash - pieces have been cut but finish work is still required
7) Wiring for Speedo - Need to get adapter for transmission to mate with the sender unit
8) Wiring for Tach
9) Wiring for Instrument lights
10) Wiring of ignition cutout switch
11) Sanding, rust inhibiting and priming passenger side lower rear fender
12) Stripping, cleaning and painting trunk hinges
Not Started:
1) Upper B-Piller upholstery
2) Installation and wiring of cruse control system
3) Installation and wiring of automatic headlight system
4) Installation and wiring of center console switches
5) Installation and wiring of radio
6) Installation and wiring of heater control unit including heat valve control
7) Wiring for NOS system in trunk
8) Wiring AUX power to the trunk
9) Wiring of turn signals
10) Installation and wiring of interior foot well lights
11) Sanding, rust inhibiting and priming driver side lower rear fender
12) Sanding, rust inhibiting and priming front lower fascia (below front bumper)
13) Sanding, repairing and painting interior air circulation tray (unit under back deck)
14) Sending chrome pieces in for re-chroming
15) Fill prime and sand the body
16) Sealing and installation of driver side fuel tank
17) Installation of new passenger side fuel tank
18) Cleaning and installation of evaperative control tubing in truck and C-Pillars
19) Re-installing Brake Peddle, Brake Booster and new Master Cylinder
20) Re-installing Steering Column
21) Re-installing Gear Selection Lever
22) Installation of new Emergency Brake level and cable
23) Installation of sound proofing
24) Final Paint
25) Final re-assembly
The good news is that I believe I have almost all the parts I need. Sitting on my shelf right now are:
1) All new gauges
2) All new switch gear
3) Cruse Control Kit
4) Auto Headlight Kit
5) Components to fabricate hot water control unit for heating system
6) New front and rear window seals
7) New side window rubber seals
8) New side window runner seals
9) New door handle, door lock and trunk lock seals
10) New door seals for all four doors
11) New trunk seal
12) New front turn signal, side maker and rear tail light seals
13) New passenger side fuel tank
14) Fuel tank sealing kit for driver side tank
15) New brake master cylinder
16) Sound proofing
17) Carpet Kit
Need to purchase:
1) Radio
2) Transmission adapter for speedo sender
3) I'm sure some odds and ends I've not thought of yet!
There is still a lot of work to do, but I'm pressing for June 2013 to be done. I think I can do it! Keep watching!

Saturday, December 1, 2012
Sunday, March 18, 2012
Three Months and Moving Right Along
Dateline - March 18, 2012 - I just realized that it has been three months since I've posted anything! The car is moving along real well. Thus far I've worked on:
- Left and right front door panels. Pretty much done although I still have a little more upholstery work to do.

- Filled the cracks in the plastic dash pad and covered it in wine colored vinyl.


- Maple dash is cut. Not finished yet, but good enough to work on other components. (no pictures)
- Lower fascia on passenger side has been laid up in fiberglass, covered with vinyl and the glove box is being constructed.


- Created brackets to hold up new passenger fascia.

- Lower fascia on driver side has been laid up in fiberglass and covered in vinyl. Still needs a little more work but it is coming along nicely.


- Repaired, cleaned and painted the steering column. I bought a second hand column last year because the bearings in the original were shot. The second hand column had good bearings but it looks like it had been crushed a bit (in an accident), so I swapped everything over to the old column and cleaned it up. (no pictures)
- Rearranged the turn signal switch because once I got the wood dash in place, I realized that it would not fit. Needed to make the cruse control/wiper control arm into a fixed stalk behind and slightly lower then the turn signal indicator. I used the original turn signal arm and grafted it to the GM turn signal switch gear.


- Molded the steering column cover in modeling clay ("plasticine") and laid fiberglass over that, then vinyl


- Ordered and received new bayonet type fuse blocks that will replace the glass fuses currently in the car. The fuses will be moved from behind the center dash to behind the passenger lower glove-box. This will work great because there is a lot of space there and I have fashioned the glove-box to open all the way so that you can reach in to get to the fuses! I also have four more fuses then I had before, so I can get rid of the inline fuses that were being used for other things like the rear window defroster, radio, transmission lockout, etc.

- Ordered and received Delphi type water resistant connectors for things like the outside turn signals, side markers, etc. I installed some.

- Started a small amount of rewiring of the fuses but have not done much until I'm finished with the inside.


- Ordered the right fuel tank (the one that is Swiss cheese). Still waiting for that to come in. (no pictures)
- Ordered a carpet kit from a company called Lakewell in Belgium (http://www.lakewell.com/en/products/jaguar/xj/full-carpet-set-jaguar-xj6-xj12-s1-saloon-68-73). Should be delivered in a couple of weeks. (no pictures)
So, things are moving along nicely. I have a few more weeks of interior work to do, then I can start concentrating on the wiring, which is going to be a significant effort, but is the last work to do before I go back to bodywork.
Tuesday, December 27, 2011
Great Movement Forward
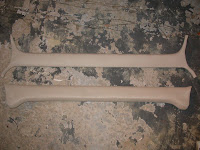
Dateline - Dec 27 – I got a lot done over the last few weekends. I finished the headliner and four pieces of trim that go around it including the tops of the front and back windows and the strip that runs over the tops of the doors and down the sides of the back window to the back deck. These pieces were particularly difficult because they consisted of a metal strip that required sanding, rust encapsulation and painting, a pressed wood piece that formed the main structure that needed to be completely recreated, a rubber piece that looks like a pool table rail that is glued to the metal piece and about 20 metal fasteners that needed to be cleaned and rust treated. The car had both sides of this trim, but neither was complete. With what was remaining I had enough pieces to make a pattern for the wooden parts and was able to fabricate those out of pressed board. The rubber piece was a little harder. On one side it was complete, but on the other side, there was about 9 inches missing in the back. I knew I wouldn't be able to source this easily, so I would have to come up with another solution. Cleaning the metal clips (20 in all) was going to be a challenge too, but fortunately for me, I have a vibratory part cleaner that made short work of them.

Once I got all the pieces made, cleaned and painted then started assembly. This had to be done in a specific order. First the clips needed to be glued to the rail. Then the rubber piece needed to be glued to the rail over the backs of the clips. I then had to replace the nine inches of missing rubber. I did this by using pink foam epoxied to the rail and sanded to shape. Then I upholstered the wood piece and the assembled metal/rubber/clips piece with headliner upholstery. Then I assembled the two upholstered pieces, using the clips to hold everything in place. They really look good and I'm very happy with the results. (Sorry I didn't take any pictures of the assembly process, but here are pictures of the finished pieces including the headliner and upper window frame pieces)


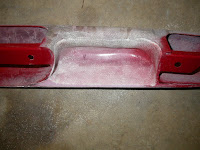
While working on this, I was also working on getting the two back deck pieces and two front window side frame pieces that are upholstered in the "wine" colored vinyl. This was pretty straight forward, using rubber cement to glue the vinyl. The front window side pieces required five separate steps to get everything glued down because of the multiple complex curves being covered. But I'm happy with the results. The big challenge with the back deck was the air flow vent in the center of the deck. This consisted of a metal framework with a metal mesh piece inside, and an upholstered wood cap on top. I had to clean, sand, rust encapsulate and paint all the metal pieces, and upholster the wood top piece. I picked a Rustolum flat enamel paint in a rattle can for the metal pieces. It looks pretty close the color of the vinyl, so that worked out well.


I also worked on reshaping the door handles so that they would be easier to upholster. I added pink foam and sanded to shape, then fiber glassed over them. I had some problem with an epoxy mix that did not set, so I had to redo one of the handles, but overall, I'm happy with the results. These will be much easier to cover and actually, I like the look better. So win-win!


While I was reshaping the door handles, I also worked on sanding and fitting the foam for the center console fascia. I knew that I was going to need to do some fitting after I got the center console upholstered, plus I changed my plans and decided to go with a single DIN radio on top with a cup holder below, instead of a 2 DIN radio. So I added some foam and sanded down the rest so that it will fit in the center console. Now I need to do the fiberglass/carbon fiber layup.

After getting the door handles shaped, it was time to upholster. I needed to cut and sew the upholstery for both door handles as well as one of the door pockets. I spent the better part of two evenings doing that and then half a day gluing the upholstery to the handles using rubber cement. They came out REALLY good, and I’m very happy with them. I also lined the insides of the pockets with headliner material so that things put into the pockets wouldn’t rattle.


Finally, I worked on getting the door upholstery done. I ended up with a challenge that I didn’t figure on when I created the door panels themselves; the depth and steepness of the door opener handle and the carbon fiber inset. I knew that I wasn’t going to be able to stretch the vinyl to fit into the holes, so I was planning on sewing an insert into them. However, this turned out to be much harder than I thought, partly because I’m not the most skilled upholstery person and also the difficulty in working with the fabric. I tried sewing in a piece into the door handle area and it looked horrible. So I came up with a brilliant plan to deal with the carbon fiber inset. I created a flat wood panel that the carbon will be glued to and that will then be screwed into brackets added to the back of the door panel. This way, the panel will stretch the vinyl into the hole enough so that I don’t have to deal with sewing.


The door opener handle will be a little more difficult. I was going to try to create a fiberglass/carbon inset that would fit over the vinyl, but that just was not turning out the way I wanted. So I decided to create a vinyl inset that will be glued to the door panel over which the vinyl for the door will sit. I will need to glue this vinyl to the vinyl inset, but that will look much more clean then trying to sew all the pieces together. I may have to make some more adjustments to get this just right, but I think I’m on the right path.

It's really nice to have so many pieces DONE and ready to go into the car. Things are moving forward and if I keep up the work through the winter, I may be able to make a running date for the Greenwood Auto Show this year. That's the plan anyway!
Next: Finish the upholstery for the doors and lay up the center console fascia. Then I need to start on getting the wiring sorted. After that, finish the dash including the wood and the lower fasciae that need to be shaped, fiber glassed and upholstered. After that, it’s a matter of getting the rest of the body work done and painted, then I can start putting things back together.
I do have two major purchases I have to get yet: Gas tanks and carpets. I also need to get all my chrome pieces in to be re-plated. But things are starting to move forward! Very exiting!

Once I got all the pieces made, cleaned and painted then started assembly. This had to be done in a specific order. First the clips needed to be glued to the rail. Then the rubber piece needed to be glued to the rail over the backs of the clips. I then had to replace the nine inches of missing rubber. I did this by using pink foam epoxied to the rail and sanded to shape. Then I upholstered the wood piece and the assembled metal/rubber/clips piece with headliner upholstery. Then I assembled the two upholstered pieces, using the clips to hold everything in place. They really look good and I'm very happy with the results. (Sorry I didn't take any pictures of the assembly process, but here are pictures of the finished pieces including the headliner and upper window frame pieces)


While working on this, I was also working on getting the two back deck pieces and two front window side frame pieces that are upholstered in the "wine" colored vinyl. This was pretty straight forward, using rubber cement to glue the vinyl. The front window side pieces required five separate steps to get everything glued down because of the multiple complex curves being covered. But I'm happy with the results. The big challenge with the back deck was the air flow vent in the center of the deck. This consisted of a metal framework with a metal mesh piece inside, and an upholstered wood cap on top. I had to clean, sand, rust encapsulate and paint all the metal pieces, and upholster the wood top piece. I picked a Rustolum flat enamel paint in a rattle can for the metal pieces. It looks pretty close the color of the vinyl, so that worked out well.


I also worked on reshaping the door handles so that they would be easier to upholster. I added pink foam and sanded to shape, then fiber glassed over them. I had some problem with an epoxy mix that did not set, so I had to redo one of the handles, but overall, I'm happy with the results. These will be much easier to cover and actually, I like the look better. So win-win!


While I was reshaping the door handles, I also worked on sanding and fitting the foam for the center console fascia. I knew that I was going to need to do some fitting after I got the center console upholstered, plus I changed my plans and decided to go with a single DIN radio on top with a cup holder below, instead of a 2 DIN radio. So I added some foam and sanded down the rest so that it will fit in the center console. Now I need to do the fiberglass/carbon fiber layup.

After getting the door handles shaped, it was time to upholster. I needed to cut and sew the upholstery for both door handles as well as one of the door pockets. I spent the better part of two evenings doing that and then half a day gluing the upholstery to the handles using rubber cement. They came out REALLY good, and I’m very happy with them. I also lined the insides of the pockets with headliner material so that things put into the pockets wouldn’t rattle.


Finally, I worked on getting the door upholstery done. I ended up with a challenge that I didn’t figure on when I created the door panels themselves; the depth and steepness of the door opener handle and the carbon fiber inset. I knew that I wasn’t going to be able to stretch the vinyl to fit into the holes, so I was planning on sewing an insert into them. However, this turned out to be much harder than I thought, partly because I’m not the most skilled upholstery person and also the difficulty in working with the fabric. I tried sewing in a piece into the door handle area and it looked horrible. So I came up with a brilliant plan to deal with the carbon fiber inset. I created a flat wood panel that the carbon will be glued to and that will then be screwed into brackets added to the back of the door panel. This way, the panel will stretch the vinyl into the hole enough so that I don’t have to deal with sewing.


The door opener handle will be a little more difficult. I was going to try to create a fiberglass/carbon inset that would fit over the vinyl, but that just was not turning out the way I wanted. So I decided to create a vinyl inset that will be glued to the door panel over which the vinyl for the door will sit. I will need to glue this vinyl to the vinyl inset, but that will look much more clean then trying to sew all the pieces together. I may have to make some more adjustments to get this just right, but I think I’m on the right path.

It's really nice to have so many pieces DONE and ready to go into the car. Things are moving forward and if I keep up the work through the winter, I may be able to make a running date for the Greenwood Auto Show this year. That's the plan anyway!
Next: Finish the upholstery for the doors and lay up the center console fascia. Then I need to start on getting the wiring sorted. After that, finish the dash including the wood and the lower fasciae that need to be shaped, fiber glassed and upholstered. After that, it’s a matter of getting the rest of the body work done and painted, then I can start putting things back together.
I do have two major purchases I have to get yet: Gas tanks and carpets. I also need to get all my chrome pieces in to be re-plated. But things are starting to move forward! Very exiting!
Friday, December 9, 2011
Recaping the Summer and New Work
Dateline – Dec 8, 2011 – Well, after a long summer of doing other things, I’m back to working on the car! It’s hitting the cold and wet season, so I am going to concentrate on getting interior done, since I can do that in the house.
I left off with door panels and getting my new sewing machine and materials. Earlier in the year, I completed the upholstery on several pieces of the interior, including the center console (still have a few details to iron out), the center kick panels that have the heater vents in them, the front side kick panels, and the fabric for the “B” pillars. The side kick panels were interesting because they were originally made of pressed paper. Years of moister destroyed those, so I recreated them out of mat board and sealed with roofing sealant. We’ll see how well they hold up. I’m thinking they will do okay.


I let the car sit for about three months to do other things, but started back on it in November by going over to my friend Matt’s house and using his woodshop and experience to work on the dash. We had worked on it in the spring, finding some amazing book-matched pieces of maple at a hardwood lumber store in Seattle (Cross Cut Hardwoods - http://www.crosscuthardwoods.com/). We were looking for good quality plywood to be the backing for the pieces of birds-eye that we had cut up in February. We found the substrate, but also found this amazing book-matched maple and decided to make it into the new dash instead. So we cut everything roughly to shape and glued the maple down to the substrate with gorilla glue. Several months passed and then we got together to start shaping the dash from the rough pieces. We got the left and right sides drown out and cut, including the holes for the speedo, tach, air vents and glove box door. Matt has the appropriate wood working tools that made this much easier to do and we have much better results then I would have hacking stuff out with a saber saw in my garage. It’s so nice to use the right tool for the right job. It’s also nice sharing in a fun project with a friend!


Even though I had worked on the dash, the car itself still languished in the garage, becoming an SUV (Storage Utility Vehicle, or “place-to-put-boxes-and-stuff”). So, I started the first week of December by cleaning up my workspace, moving things off the car, and then starting to strip, rust remove and paint the interior trip components including the metal pieces that go around front and back window, the back deck components and the trip the runs along the top of the doors from the front window to the back. Several of these pieces either have pressed wood components or are all pressed board. These will need to be replaces and I’m using what is left of the originals to fabricate to pieces. Fortunately, there are enough pieces left to get a good pattern.


I also completed fabrication on the right (Passenger) side door panel. I had laid up the fiberglass in the spring and then left it until later to finish. I got it all done and fitted including pressed board insets glued to the back of the door panels for the plastic holders that hold the door panel onto the door.


I started sewing the upholstery for the arm rests/door pulls and realized that the complexity of the shape is going to be really hard to cover with vinyl, akin to covering a steering wheel. To make things easier, I’m going to modify the shape so that it will be easier to cover. This should be pretty easy to do by adding some more pink foam and glassing over that. The time savings in upholstery work will easy pay for the extra foam/glass work. Also, I think it will ultimately look nicer too.
I have also covered the left (driver’s side) door panel with the foam substrate and have started the upholstery, sewing the burgundy and tan vinyl together. I’m going to need to create a separate piece that will be sown in around the door handle because I will not be able to get the vinyl to stretch enough. This will be tricky to get right, but I’m getting pretty good with the sewing machine.

The next work is to complete the fabrication of the wood interior parts, checking fitment and covering everything with the appropriate materials (headliner material and/or burgundy vinyl). I also have to fix and cover the headliner which I had sitting outside the car when a tent fell on it and broke it! I should be able to repair it, but it needs to be pretty smooth in order for the head liner to look good. Will probably need to do some more fiberglass work here!
Subscribe to:
Posts (Atom)