Dateline - 05/18/2013 - I'm almost done with the wiring!!!!! It's been a really long haul, but I feel like I'm just inches away from being done. As far as I can tell, all the wiring inside the car is done, tied up and ready to go. I even activated the instrument lights to see if the dimmer worked. All the lights, including those in the switches worked and dimmed fine! Also wired in the power on/off and start switches. They appear to be working also. And I wired in the information center! The only wires I could do are the "Cruse On" and "Cruse Set" lights that I wanted. I ran the wires, but I will not know if I get a signal from the cruse control system until I have it up and working.
The only wiring left is in the trunk. I need to put a fuse box back there and wire in center backup light, and trunk interior lights.
Needless to say, I'm really happy!
What is next before paint?
- Mount the radio
- Mount the climate control switches
- Finish the air recirculation box
- Mount the new emergency brake cable
- Pull out the transmission speedo adapter so that I can buy one that fits my speedo transponder.
- Clean, seal and paint both gas tanks
- Mount the gas tanks
- Finish side the driver side of the car
- Get it painted!
While the car is in the paintshop:
- Finish the front center console fascia
- Stain and finish the dash board
When the car come back:
- Install sound proofing
- Put the car back together
So, my plan has changed. I thought I could get this car done this year. The way things look, I'm going to be happy if I can get the car painted before winter. That will give me three months to put everything back together (and not have to hurry through it). So, it looks like next spring I should have it running.

Monday, May 20, 2013
Monday, May 13, 2013
Getting Closer and Closer
Dateline - 05/12/2013 - More wiring this weekend, but there is a light at the end of the tunnel! I believe I have all the wiring done inside the car accept for the dimmer control, the power/ignition switches, connections for the Information Center and the fuse block in the trunk! All the switches are wired, all the instrument lights are wired, the radio is wired, the climate control is wired and I've cleaned up almost all the wiring harnesses! Boy it will be nice to be done with wiring!
On Sunday I worked on the dimmer control. I bought this dimmer control (http://www.amazon.com/gp/product/B003L4KKF2/ref=oh_details_o07_s00_i00?ie=UTF8&psc=1) and found the box to be too big and the screw connectors were not what I wanted. So I printed a new box using my 3D printer and ABS plastic, and created a new box that will allow me to mount the dinner control and the box easily. I mounted the CB and glued the halves together using hot glue which should make it pretty water tight also. Here are pictures:


On Sunday I worked on the dimmer control. I bought this dimmer control (http://www.amazon.com/gp/product/B003L4KKF2/ref=oh_details_o07_s00_i00?ie=UTF8&psc=1) and found the box to be too big and the screw connectors were not what I wanted. So I printed a new box using my 3D printer and ABS plastic, and created a new box that will allow me to mount the dinner control and the box easily. I mounted the CB and glued the halves together using hot glue which should make it pretty water tight also. Here are pictures:


Monday, May 6, 2013
No Work On The Car This Weekend.
Dateline - 05/04/2013 - No work on the car this weekend. We had our first 80 degree weekend and I *had* to do yard work. My cat walked out into the lawn on Saturday and disappeared in the grass! Good news now is that all I have to do is maintain it now. I may be able to get some time in the evenings to work on the car. I've been biking to work three days a week so when I get home, I'm not very motivated to work on the car, and it's getting on to 7:00 pm. But if I'm going to get it done, I need to do it!
Monday, April 29, 2013
Like What I Said Last Week - "Why Can't The Wiring Be Done Already!"
Dateline - 04/28/2013 - Took Saturday off because I wasn't feeling well, so worked on the car 1/2 day on Sunday. Again, more wiring, but I'm really making headway! I have all eight switches that go into the center console wired and tied off! YES! Now I have two switches that go on the left lower facia (Master Power and Headlight Override) to wire, but I need to order the connectors. I also have the digital dimmer switch to finish up. I printed the box for it on my 3D printer on Saturday, so now I just need to wire it up. I have to change the instrument light wiring that I created last year because I need to run the ground back to the switch, not to the chassis as I had originally ran it. That gave me a chance to clean up some of that wiring too.
So what is left? Wiring the fuse box in the trunk, dimmer switch, and cleaning up the remaining wiring harnesses. Wow! I'm really getting there! Yahoo!
So what is left? Wiring the fuse box in the trunk, dimmer switch, and cleaning up the remaining wiring harnesses. Wow! I'm really getting there! Yahoo!
Monday, April 22, 2013
Why Can't The Wiring Be Done Already!
Dateline - 04/20/2013 - Another full day of working on wiring. Boy-o-boy is this getting old! The good news is that I've rerouted all the wires the way I want them, and laced them all together. I left off with making up the wires for the switches. I know how long they need to be and have them all ready to go, but ran out of steam at 5:00 pm. So now, all I need to do is make up the switch connectors. I do need to do some rewire for the instrument lights because I bought a digital dimmer control, but that shouldn't take too long. I still have to sort out the wires running to the trunk on the drivers side of the car. I also need to mount my new fuse block in the trunk. But it's coming down to brass tacks now.
After I got done working on wiring, I went into the house and did some more work on the rear air recirculation box. Several posts ago I reported that I scrubbed away a great deal of the rust and fiber glassed the holes. This weekend I put a nice clear coat of resin to fill in any gaps. I also took about the three remaining flapper doors and cleaned then up and rust sealed them. I need to make one flapper door out of some sheet steel, then find a good replacement fabric for the hinges. Yes, the original used a rubber impregnated silk as a hinge! I think I'm going to get a good ripstop nylon or Kevlar.
Well, that's it for this weekend!
After I got done working on wiring, I went into the house and did some more work on the rear air recirculation box. Several posts ago I reported that I scrubbed away a great deal of the rust and fiber glassed the holes. This weekend I put a nice clear coat of resin to fill in any gaps. I also took about the three remaining flapper doors and cleaned then up and rust sealed them. I need to make one flapper door out of some sheet steel, then find a good replacement fabric for the hinges. Yes, the original used a rubber impregnated silk as a hinge! I think I'm going to get a good ripstop nylon or Kevlar.
Well, that's it for this weekend!
Monday, April 15, 2013
Little Work This Weekend
Dateline - 04/14/2013 - I didn't do much work on the car this weekend. I had to take care of the other Jaguar. It needed a 90K mile service, plus an emissions test and new tabs. Took care of all that (and got a haircut, no, a real haircut, to boot!). That was most of my Saturday. I did try do some work with my 3D printer that was car related though. I'm trying a new type of plastic called ABS instead of PLA in my printer. PLA is easy to print with because it heats at a lower temperature (185 degrees) and doesn't warp a lot. ABS needs about 230 degrees and a very warm bed to print on (around 110 degrees) otherwise, it will warp, which makes it much harder to work with. The advantage of ABS is that it is not biodegradable like PLA. So, I want to make sure that any parts I build that will be on the car are in ABS not PLA.
The problem I've found is that my hotbed will only go up to about 80 degrees, not hot enough to keep the ABS stuck to it, so when it warps, it actually detaches from the bed and ruins the print. I need to do some research to see if I can get the hotbed hotter. I've seen a couple of blog postings about that, so we shall see.
Another car related 3D item is the center indicator bezel was printed in PLA and I want to print it in ABS. The problem is that I lost the model I used to create the original because of a hard drive failure. So I spent about two hours on Sunday recreating the model. Tedious! And I really hate doing things a second time. But that's what you get for not doing enough backups!
So, not a very productive car weekend. But I'm going to try to spend some time after work this week to get some stuff done. Looks like it will be warming up a bit this week, so that will make it easier to go out in the garage!
The problem I've found is that my hotbed will only go up to about 80 degrees, not hot enough to keep the ABS stuck to it, so when it warps, it actually detaches from the bed and ruins the print. I need to do some research to see if I can get the hotbed hotter. I've seen a couple of blog postings about that, so we shall see.
Another car related 3D item is the center indicator bezel was printed in PLA and I want to print it in ABS. The problem is that I lost the model I used to create the original because of a hard drive failure. So I spent about two hours on Sunday recreating the model. Tedious! And I really hate doing things a second time. But that's what you get for not doing enough backups!
So, not a very productive car weekend. But I'm going to try to spend some time after work this week to get some stuff done. Looks like it will be warming up a bit this week, so that will make it easier to go out in the garage!
Monday, April 8, 2013
Starter Circuit and More Wire Cleanup
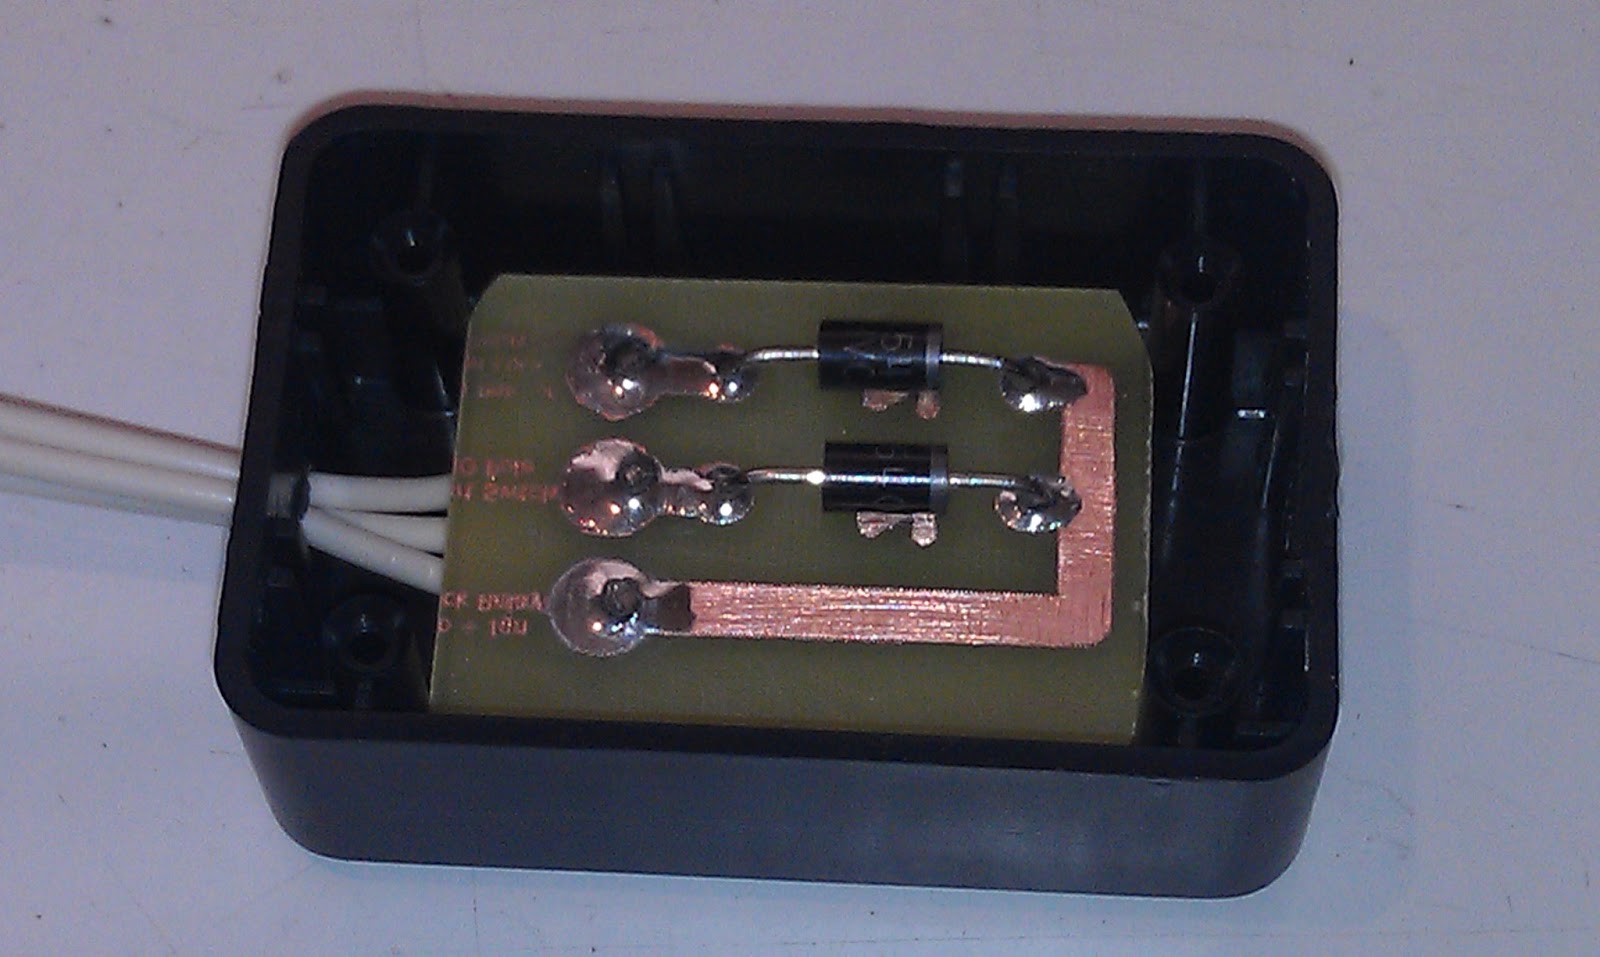
Dateline - 04/06/2013 - Spent Saturday putting together my starter circuit. I did some work on this several weeks ago but was not happy with the results. I had soldered two diodes in line with the actual wire and I was thinking that is just an open circuit waiting to happen! So I etched a little circuit and mounted it in a box from radio shack:


After I put that together, I mounted it under the dash and re-wired the four relays. It took longer then I expected it would take, but I got everything working and tested. It's going to be cool to have the power and start buttons on the center console!
The rest of the day was spend doing wire clean-up. One thing is for sure, if I ever do this again, I'm going to spend more time running wire in a clean fashion while doing the work instead of tying to do it after. Going back and doing cleanup really sucks! I've probably wasted about 100 slices just cutting and re-cutting! "If you can't find time to do it right, when are you going to find time to do it over!"
By about 6 pm I was done. I was feeling a bit under the weather, so I called it a day.

After I put that together, I mounted it under the dash and re-wired the four relays. It took longer then I expected it would take, but I got everything working and tested. It's going to be cool to have the power and start buttons on the center console!
The rest of the day was spend doing wire clean-up. One thing is for sure, if I ever do this again, I'm going to spend more time running wire in a clean fashion while doing the work instead of tying to do it after. Going back and doing cleanup really sucks! I've probably wasted about 100 slices just cutting and re-cutting! "If you can't find time to do it right, when are you going to find time to do it over!"
By about 6 pm I was done. I was feeling a bit under the weather, so I called it a day.
Subscribe to:
Posts (Atom)